Unit 5: Homework
Displacement Maps
Directions
1. Open in photoshop original image you wish to bend the texture to in layer 1.
2. Open the image you want to displace in another layer (layer 2) and place it where you would like.
3. Turn off layer 2, open the history tab, and then select the button that looks like a camera with a plus sign over it, which will create a duplicate of your original image.
4. In the copy, go to Image, Adjustments, then Desaturate, so the image is in black and white.
5. Save it as "Displacement" and close the copy.
6. Then, with layer 1 selected and layer 2 visible, go to Filter, Distort, and then Displace. When it asks you to choose a file, select the file you named "Displacement."
7. Then, under the Normal tab on Layers, select Overlay instead to create a more realistic look. You can also change the opacity to your preference.
8. If there is any area on the image you would not like panted, create a layer mask over layer 1, and paint away the areas with the Paintbrush tool.
Example Images
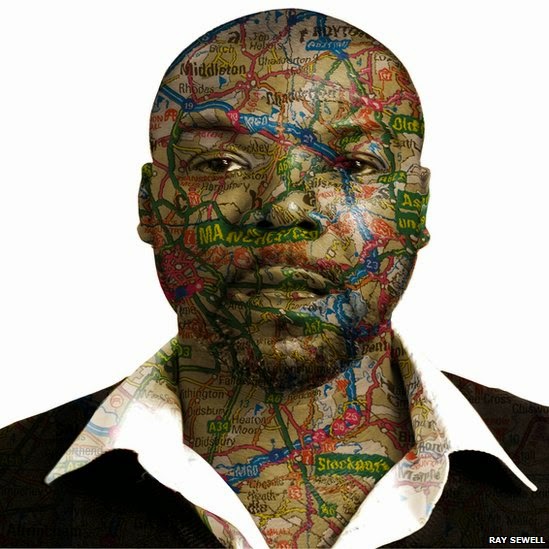 Pic #1: http://www.discoverdigitalphotography.com/2012/photoshop-tutorial-how-to-apply-a-texture-to-a-face-by-using-a-displacement-map/
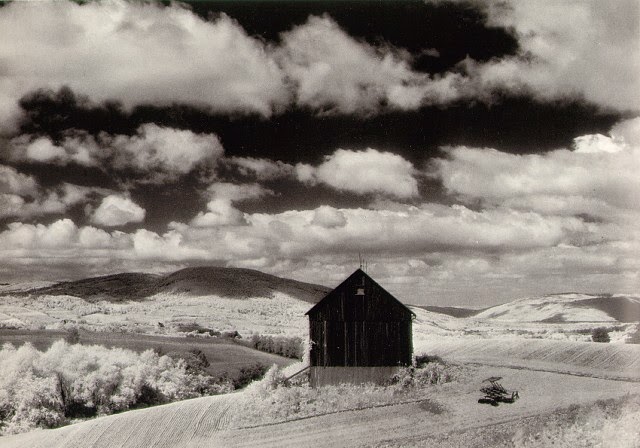
Pic #2: http://chixthatklik.wordpress.com/2012/11/10/displacement-maps/
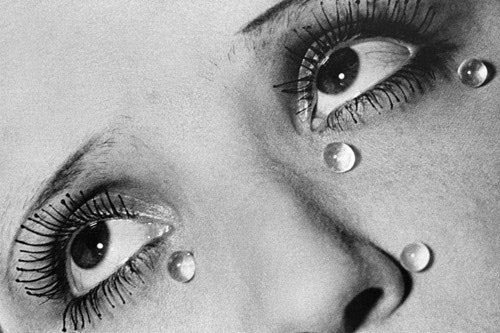
Pic #3: http://www.bbc.com/news/in-pictures-21335463
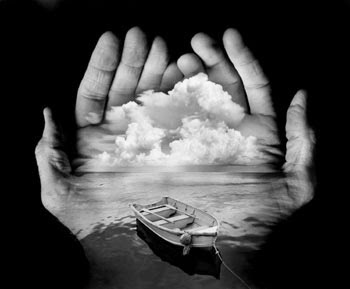
Pic #4: http://www.photoshopessentials.com/photo-effects/water-reflection/
Pic #1: http://www.discoverdigitalphotography.com/2012/photoshop-tutorial-how-to-apply-a-texture-to-a-face-by-using-a-displacement-map/
Pic #2: http://chixthatklik.wordpress.com/2012/11/10/displacement-maps/
Pic #3: http://www.bbc.com/news/in-pictures-21335463
Pic #4: http://www.photoshopessentials.com/photo-effects/water-reflection/
Unit 4: Blog Entry
1. Minor White
 White was born in Minnesota, and began his art career in 1937 when he began photographing landscapes in Oregon. His style mimicked Ansel Adams' in the way his photography was both symbolic yet simple. In 1946, Ansel Adams offered White a teaching position at the California School of Fine Arts in San Francisco. He continued exploring "equivalency", where an image serves as an idea or emotional state beyond the subject pictured. Near the end of his career, while serving as professor of creative photography at the Massachusetts Institute of Technology (MIT), he produced his most powerful piece, Essence of Boat, depicting a broken boat half covered in snow, symbolizing the end of his life and career.
2. Cindy Sherman
 Sherman was born in Glenn Ridge New Jersey in 1954, but did not show an interest in photography or the arts until she was exposed to it in college. After studying photography at Buffalo State University, Sherman and several other artists formed Hallwalls, an independent artists' space where she and fellow artists exhibited. Sherman is known for her self portraits, that place her in the role of other women at the time and comment of social justice issues. her most famous photographs of this type are the United Film Stills. Her work transformed in the mid 1980's, shown in the Disaster and Fairytale series; which for the first time, did not show herself as the subject. She is currently living and working in New York city.
3. Man Ray
Ray was born in 1890, and grew up in Brooklyn as a Jewish immigrant from Russia. His early influences were Alfred Stieglitz and Robert Henri, who helped him grasp the early concepts of art.
 After exploring Dadaism, which challenged existing notions of art and literature, and encouraged
spontaneity, Ray moved to Paris where he created some of his most famous portraits of the artistically and literarily elite. Endlessly versatile, Ray also experimented with fashion photography during his years in Paris. In his later career, he continued to display his work all around the world and died in 1976.
After exploring Dadaism, which challenged existing notions of art and literature, and encouraged
spontaneity, Ray moved to Paris where he created some of his most famous portraits of the artistically and literarily elite. Endlessly versatile, Ray also experimented with fashion photography during his years in Paris. In his later career, he continued to display his work all around the world and died in 1976.
4. Jerry Uelsmann
 Uselmann was born in Detroit, Michigan in 1934. Throughout his career, his photography has had surreal and mystical themes that contain deeper meanings and have an eerie theme. Despite the impossible scenes he creates with his photos, he does not use photoshop; and instead layers his photos in the darkroom, using up to 7 or 8 layers when a photo is completed. He is an accomplished photographer and has received a Guggenheim fellowship in 1967 and a National Endowment for the Arts Fellowship in 1972. He has thought at the University of Florida since the 1960's and currently lives with his wife, Maggie Taylor in Florida.
Unit 3: Blog Entry 1
1. Get on their level

- I crouched down to capture this level shot of this cactus flower in Zion National park, Utah. I like this angle a lot because it creates a more engaging and personal view of the subject.
- Another part of this technique is to focus on one element in the photo and leave a blurred background to create even more of a centered focus around the main subject.
- With this photo in particular, the blurred background is also visually interesting, and although it is blurred, the viewer can still get a sense of the immense beauty and size of the canyon, while focusing on something as small and numerous as a simple flower.
- The colors in this photo also add interest. The overpowering browns and greens are balanced with the sharp and enhanced yellow of the cactus flower.
- Source: (Mallory McMurray)
2. Use a plain background
- By setting the building and the plant life on the left side of the image against the plain background of the sky, it makes the main subjects on the image stand out even more.
-Although the background is not exactly one universal color and is kind of alike a gradient, it still provides a background that allows the viewer to focus on the subjects.
- This photo in particular was taken during golden hour at the Arizona State University Campus.
- Source: (Mallory McMurray)
3. Use flash outdoors
- By using flash outdoors, the photographer is able to create a well lit photo even when the he does not have full control of the lighting.
- Using this technique gives the photo the best of both worlds; a well lit model as well as the natural beauty of natural lighting.
- Source: (Bob Lai)
4. Move in close
- Photographing a subject up close can eliminate a distracting background and allow the viewer to focus all their attention on the subject; because that's all there is to see.
- When photographing a subject this closely, the photographer can also focus on texture, pattern, line, shape, and other elements of photography.
-With this photo in particular, a not so interesting subject like a car's wheels can be focused on and made interesting because of the circular pattern of the bolts and the sleek lines of the spokes.
- Source: (Mallory McMurray)
5. Take some vertical pictures
- Taking vertical photos can add variety to a photographers collection and take advantage on a landscape that is more visually interesting going up and down than horizontally.
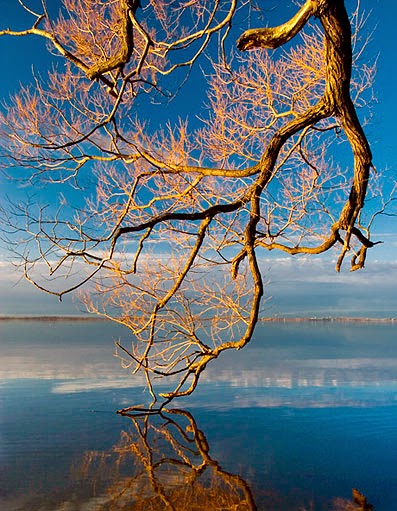
- This photo of a canyon in Zion National Park, Utah not only takes advantage of a vertical angle, but also line and shape. The curving lines on the rock shaped by water lead the viewers eye to the back of the photo, while the pop of green color adds color and more visual interest.
- The glassy surface of the water also acts sort of as a mirror, making the cave walls appear even longer then they actually are, and stretching the photo even more vertically.
-This photo is also an example of the first technique discussed here, "Get on their level."
- Source: (Mallory McMurray)
6. Lock the Focus
- Capturing this photo was difficult because the camera's auto focus setting wanted to focus on the background, rather than my dog Lola, the subject.
- By holding down the shutter halfway however, I was able to lock the focus before capturing the image, giving me the result I wanted.
- This is one of my favorite pictures of my dog because of the contrast in the yellow and green colors, and the way I was able to enhance her eyes in photoshop.
- Source: (Mallory McMurray)
7. Move it from the middle
- When taking this photo, I had the opportunity to center the two roosters, and have relatively the same background.
- By moving the subjects of the photo to the left however, I took advantage of a rule of thirds composition, making an ok photo pretty interesting.
- I also brought out the colors in this image a lot, almost to a surreal level, to add more interest through color.
- Source: (Mallory McMurray)
8. Know your flash's range
- In a scenario as important as wedding photography, knowing the limitations and abilities of your camera is crucial.
- Although the photographer was far away from his subjects, he made sure to be at a distance where the flash would still light up his subjects and still capture a great deal of the interesting background.
- The colors in this photo also add interest, the pop of pink on the brides wrist offset all the dark grey and white tones.
- Source: (Simon Burt)
9. Watch the light
- I took this photo during golden hour, when the sun is setting but still provides enough light to not need flash.
- I took this photo from an angle where the sun would shine through the sculpture, illuminating it and adding a golden tone to the entire image.
- There are also several elements in this photo that compete with, but do not overpower each other. The palm trees, the sculpture, and the sun itself, all become areas of focus for the viewer to look at, but each holds equal importance and weight in the photo, creating a balanced composition.
- Source: (Mallory McMurray)
10. Be a picture director
- When taking photos of people, it's important to be clear and precise in your directing.
- I tried taking a friend's senior portraits once, and I realized that is the most important but also one of the most difficult parts of portrait photography; directing your model to interesting and flattering photos takes practice and patience.
- With this photo, I simply asked the cop to look relaxed and composed while watching over his city.
- Source: (Mallory McMurray)
Unit 3: Blog Entry 2
People:
In this photo, the model is positioned in the right two thirds of the photo, adding a more stylistic touch to the picture. The colors of the background also compliment the models, hair, eyes, and top.
(Source: Michelle Moore Photography)
 This time, the girl is positioned in the left side of the photo, but it is still rule of thirds composition. Again, although she is not centered in the photo, she is still clearly the only subject, and the background space does not distract from her being the focal point of the image.
(Source: Karen Walrond Photography)
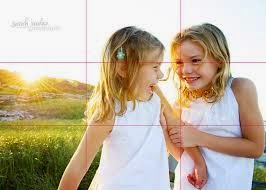
This picture is different from the others, because it features two models or focus points, but still has enough space in the left portion to qualify it as a rule of thirds photo. The beautiful backdrop compliments, but does not compete with the girls.
(Source: Sarah Jordan Photography)
Places:
 Although this picture is hard to recognize as being rule of thirds composition; it still is because the slight increase of the mountain or tree formation in the background slopes up in the left third of the page, being the only changing element in the photo.
(Source: http://theartofmyart.blogspot.com)
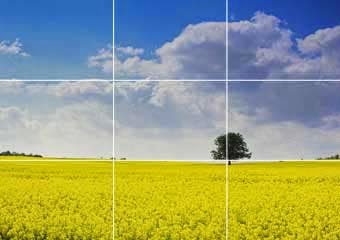
 This is a more traditional composition, featuring a tree in the right third of the page; clearly the most dominating element in the picture.
(Source: http://theartofmyart.blogspot.com)
This rule of thirds photo also features a tree in a mostly spacious landscape, clearly demonstrating rule of thirds.
(Source: http://dslrimagery.blogspot.com/2010/09/photographic-composition-balance-and.html)
Things:
 The lighthouse in this photo is located in the right section of the frame, and therefore qualifies as rule of thirds. The contrast colors in this photo also make it beautiful and unique.
(Source: http://www.photographymad.com/pages/view/10-top-photography-composition-rules)
 This incredibly simple photo of a bonsai tree against a bopping brown background is made interesting by its rule of thirds composition.
(Source: http://gabrriellehudson.wordpress.com/2013/06/28/280613-storyboarding-and-rule-of-thirds/)
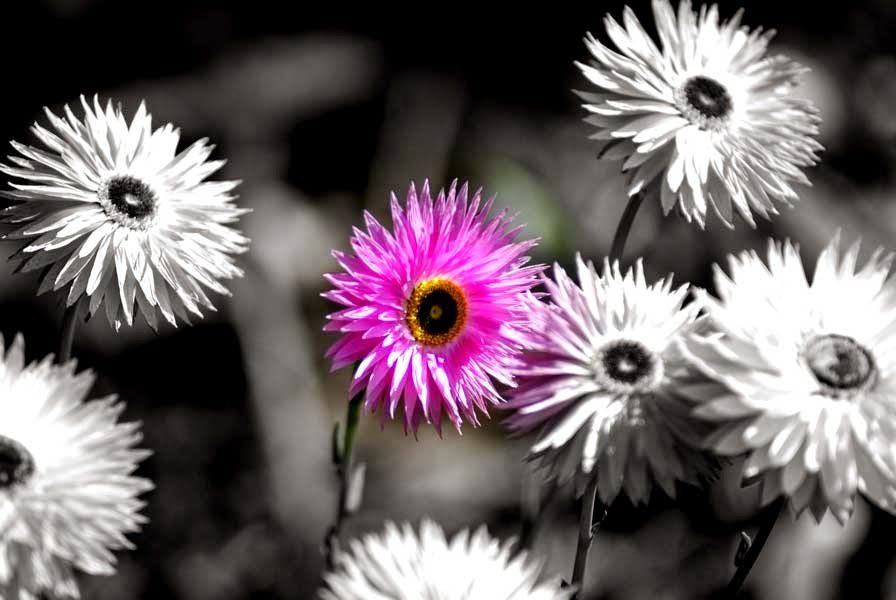
 This picture is more questionably rule of thirds, because the flower looks almost centered in the image, however if you look closely you can see it in more shifted to the left, in the lower left two thirds quadrant, and none of the petals fall into the right third section.
(Source: http://richard.rathe.org/wp-content/uploads/2010/04/flower-rule-of-thirds.jpg)
Unit 2: Blog Entry 1
Principles:
1. Balance- As a basic principle of art (specifically of design), the definition of balance refers to the ways in which the elements (lines, shapes, colors, textures, etc.) of a piece are arranged. For a photo to show balance, all the elements in the photo must have equal importance and not outweigh the other.
Source: (http://photo.net/photo-of-the-week-discussion-forum/00DSYM)
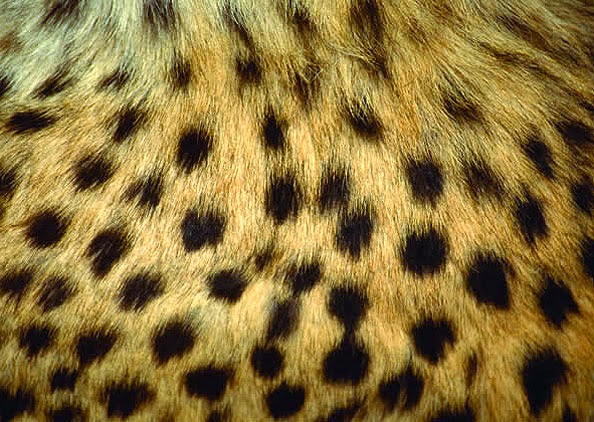
2. Pattern- Patterns, both natural and man-made, bring a sense of visual rhythm and harmony to photographs that, like a series of repeating notes in a melody, capture the imagination. Patterns appear whenever strong graphic elements—lines, colors, shapes, or forms—repeat themselves. Pattern in a photo can be shown through repetition or lack of differing elements.
Source: (http://chiaroscurophotoblog.blogspot.com/2010/06/patterns-and-textures.html)

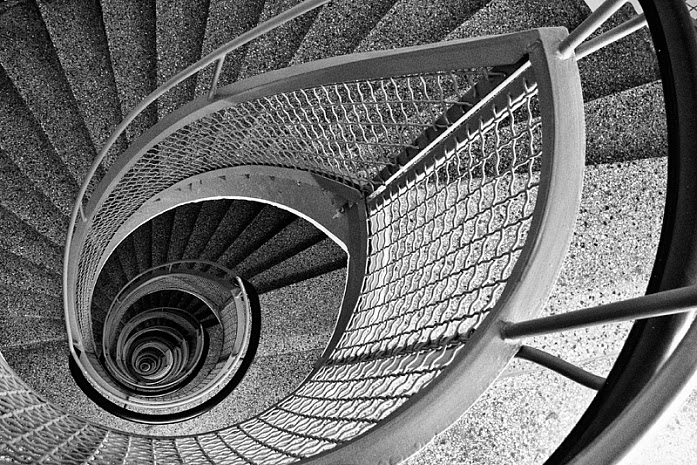
3. Rhythm- Rhythm is the repetition or alternation of elements, often with defined intervals between them.
Rhythm can create a sense of movement, and can establish pattern and texture. A photo with rhythm can appear as if it is about to come to life.
Source: (http://www.gardendesignexposed.com/rhythm_and_motion.html)
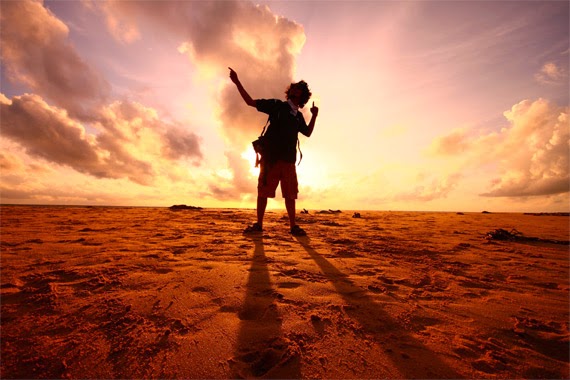
4. Contrast- Contrast is defined as the separation between the darkest and brightest areas of the image. Increase contrast and you increase the separation between dark and bright, making shadows darker and highlights brighter. The contrast in a photo is characterized by two competing elements almost in a battle of importance.
Source: (http://balla95.wordpress.com/2012/09/20/this-is-harmo/)
5. Unity- A principle of art, unity occurs when all of the elements of a piece combine to make a balanced, harmonious, complete whole. Unity in a photo shows all the elements working together visibly.
Source: (http://www.pxleyes.com/photography-picture/4b8d75fed90ac/Unity---.html)
6. Emphasis- A principle of art which occurs any time an element of a piece is given dominance by the artist.
For a photo to show contrast, one element must stand out far above the others.
Source: (http://indiandigitalartists.com/photography-course-online/composition-rules-in-photography-2/)
7. Movement- the path the viewer’s eye takes through the artwork, often to a focal area. It can be directed
along lines, edges, shapes and color. Movement is closely tied to rhythm. Movement is a photo takes the viewer on a predesigned course for the eye to follow.
Source: (https://sites.google.com/site/principlesofdesignsite/home/rhythm-movement)
Elements:
1. Line- lines within an image that leads the eye to another point in the image, or occasionally, out of the image. This could include rule of thirds composition or lines in the image that guide the viewers eyes.
Source: (http://digital-photography-school.com/rule-of-thirds/)
2. Shape- Shape is a two-dimensional element basic to picture composition and is usually the first means by which a viewer identifies an object within the picture. Shape can be formed using elements in the photo or lack thereof.
Source: (http://mackenzienmurphy.weebly.com/14/post/2012/10/shape-photography-examples.html)

3.
Form- Form is one of the seven elements of art. At its most basic, a form is a three-dimensional geometrical figure (i.e.: sphere, cube, cylinder, cone, etc.), as opposed to a shape, which is two-dimensional, or flat. This could be one element of the photo that dominates or gives an overall structure.
Source: (http://www.phonearena.com/news/Juxts-Lumia-920-Windows-Phone-Challenge-proves-mobile-photography-is-a-true-art-form-now_id44300)

4. Color- That aspect of things that is caused by differing qualities of the light reflected or emitted by them. Color is one of my favorite elements to work with in a photograph.
Source: (Lauren Nicole Photography)
 5. Space- An element of art, space refers to distances or areas around, between or within components of a piece. Space can be positive (white or light) or negative (black or dark), open or closed, shallow or deep and two-dimensional or three-dimensional. Sometimes space isn't actually within a piece, but the illusion of it is. When taking pictures, I like to leave most of the space in my pictures empty.
Source: (https://www.flickr.com/photos/leecullivan/122271605/)
6. Texture- Texture helps to emphasize the features and details in a photograph. By capturing "texture" of objects being photographed, you can create form. texture can make an incredibly simple photo unique.
Source: (http://www.wild-vision.com/home/jb_wild/texture/texture1.html)
7. Value- Level of brightness of pixel or color as defined in HSV (Hue Saturation Value) color space. I tend to prefer a lighter exposure to a darker one.
Source: (http://www.picturecorrect.com/tips/understanding-exposure-value-in-photography/)


